If you have a single page which lists many other pages on it, you might want to split them up with pagination. Let's see how to do it.
For this example, I'm going to show how I set up the pagination on this site, but of course, the steps apply to any situation where you might need pagination.
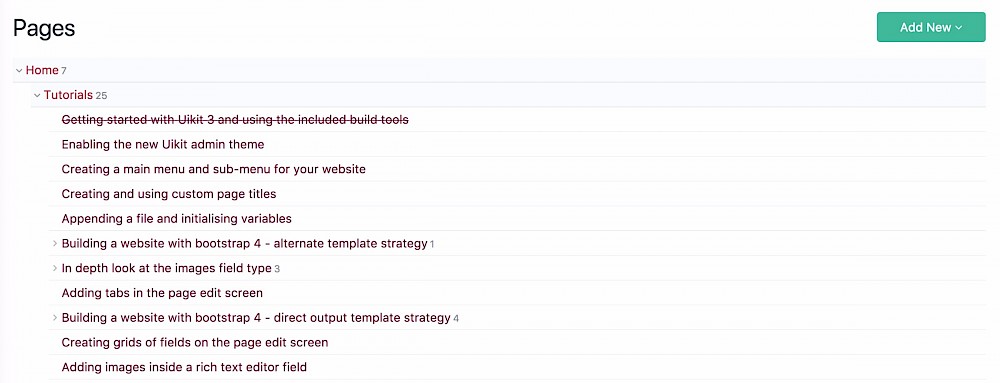
So you can see a list of child pages under the parent page 'Tutorials' and we're going to list them on the tutorials page. The tutorials page is created with a template called 'blog-index' and the child pages are created with a template called 'blog-entry'. You can call these whatever you like, but I like to call the templates 'NAME-index' for a parent and 'NAME-entry' for a child page so I can easily tell what they are for. Why didn't I call them 'tutorial-index' and 'tutorial-entry'? This started as a blog and changed to a tutorials site along the way, so I kept the template names rather than renaming them and changing the code in my template files.

So, in order to list these child pages on the parent page, this would be one way of doing it:
<?php
  // get all pages created with blog-entry template
  $entries = $pages->find("template=blog-entry");
?>

<div class="container pt-5">
  <div class="row">

  <?php foreach ($entries as $entry): ?>

  <div class="col-md-6 col-lg-4 mb-5">
    <?php echo $entry->title; ?>
  </div>

  <?php endforeach; ?>

  </div>
</div>
But this will list all pages created with the 'blog-entry' template. If you had hundreds of pages, this could be a pretty big list! So we need to set a limit in the selector to only show a certain number of pages.
<?php
// get 15 pages created with blog-entry template
$entries = $pages->find("template=blog-entry, limit=15");
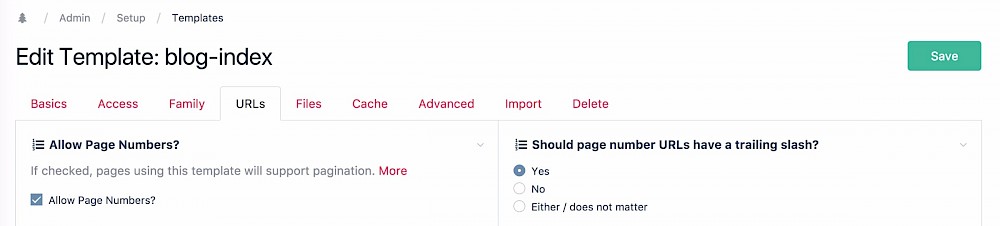
?>Now in order to set pagination, you need to allow page numbers on the template used to create te parent page.
Choose the blog-index template and on the URLs tab, check the 'Allow Page Numbers?' checkbox.
This is all that's required in the admin to set up pagination and the rest of the setup is done in the template. The easiest way to render pagination is to simply echo out the pager as seen in the official docs here.
<?php
  // get 15 pages created with blog-entry template
  $entries = $pages->find("template=blog-entry, limit=15");

  // render the pager
  echo $entries->render();
?>
However, this allows little room for customization. You probably want/need to add your own css class names to certain elements if you're using a css framework or custom solution. So we will look at the other way to render the pager where you pass in an array to the render() method.
<?php
  // get 15 pages created with blog-entry template
  $entries = $pages->find("template=blog-entry, limit=15");
?>

<div class="container pt-5">
  <div class="row">

  <?php foreach ($entries as $entry): ?>

  <div class="col-md-6 col-lg-4 mb-5">
    <?php echo $entry->title; ?>
  </div>

  <?php endforeach; ?>

  </div>
</div>

<div class="pager-nav pb-5">
<?php
  echo $entries->renderPager(array(
    'nextItemLabel' => "Next",
    'previousItemLabel' => "Prev",
    'listMarkup' => "<ul>{out}</ul>",
    'itemMarkup' => "<li class='{class}'>{out}</li>",
    'linkMarkup' => "<a href='{url}'>{out}</a>",
    'currentItemClass' => "active"
  ));
?>
</div>
For which, the pager output is:
<div class="pager-nav pb-5">
  <ul>

    <li class='active MarkupPagerNavFirst MarkupPagerNavFirstNum'>
      <a href='/processwire-tutorials/'>
        <span>1</span>
      </a>
    </li>

    <li class='MarkupPagerNavLastNum'>
      <a href='/processwire-tutorials/page2/'>2</a>
    </li>

    <li class='MarkupPagerNavNext MarkupPagerNavLast'>
      <a href='/processwire-tutorials/page2/'>Next</a>
    </li>

  </ul>
</div>
In my case here using Bootstrap 4, I used the following SCSS to style out this list:
.default-border {
  border: $border-width solid;
  border-color: $card-border-color;
  border-radius: 10px;
}

/* Pager */
.pager-nav {
  display: flex;
  justify-content: center;

  ul {
    display: flex;
    list-style-type: none;
    margin: 0;
    padding: 0;
    @extend .default-border;

    li {
      flex: 1 1 auto;

      &.MarkupPagerNavFirst a {
        border-radius: $border-radius 0 0 $border-radius;
      }

      &.MarkupPagerNavLast a {
        border-radius: 0 $border-radius $border-radius 0;
      }

      a {
        font-weight: bold;
        font-size: $font-size-base * 0.9;
        color: $gray;
        background-color: $white;
        display: block;
        padding: 0.5rem 1rem;
      }

      &.active a {
        background: $main-color;
        color: $white;
      }
    }
  }
}
And that results in a pager that looks like this:

And that's it, the processwire API makes this a very simple thing to do. Of course, nowadays you don't see as many pagers as you used to as ajax loading has become popular for scenarios like this, but this is a good starting point.
Please note: I do not store any of this information, it's simply used to send me an email. Your email address is required so I can get clarification on your request if needed.